Assembly should be carried out systematically using exactly the same method every time the bassoon is assembled or disassembled.
For Fox bassoons
Wing joint held in the right hand should be inserted into the small bore of the boot joint (held in the left hand). The engraved line at the bottom of the wing joint must be aligned exactly with the corresponding line on the boot joint to ensure perfect closure of the crook keypad by the low E key.
For all other brands (e.g. Schreiber)
The wing joint should be locked together with the long joint and both joints inserted simultaneously with the boot joint cup resting on the floor. When assembled the low E key should be depressed to check that the crook keypad is perfectly closed on the crook nipple as imperfect closure is the major cause of difficulty in obtaining the lowest notes easily.
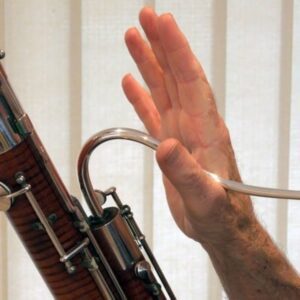
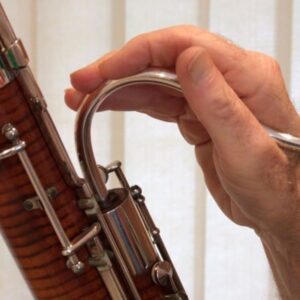
The crook
When inserting the crook into the wing joint, downward pressure must not be applied to the tip end of the crook. The crook should be held in the right hand with the finger tips resting on the top of the crook, little finger approximately 3 cm above the crook nipple and the bottom of the crook supported on the hand between the thumb and first finger where upward pressure should be applied to counterbalance the downward pressure as the crook is inserted into the wing joint ferrule with a twisting motion.
A very small amount of cork grease should be used before insertion (especially if the crook is new) to make insertion easier. Bent or split crooks are very expensive to replace and difficult or impossible to repair effectively. The above method of insertion will prevent these problems occurring.
After playing, moisture should be forcibly blown out of the reed from the round end through the tip, moisture wiped from the blades of the reed with thumb and first finger and the reed left to dry out completely in the air with reed case opened over night, so that no mould can develop on the cane. Moisture should be forcibly blown out of the crook from the large end through the tip, finger prints removed with a soft cloth and the crook left out to dry over night in the air. Three or four times a year the crook needs to be cleaned inside with a special crook cleaning brush, to remove the built up sediment.
Plastic and wooden bassoons must be dried out after playing using a pull through cleaning cloth; either one made of silk which fits through both boot and wing joints or two separate pull-throughs, one each for boot and wing joint. In either case, the cloth should go in through the large hole and out through the small hole. To dry the boot joint, hold it upright and drop the cloth’s metal weights down the wider bore. Then, holding firmly, flip the joint upside down so the weights fall around the U-bend at the bottom of the instrument, and pull slowly out through the narrow bore. Fingerprints must be removed from key work with a soft cloth every time after playing to ensure that the key work remains clean and shiny. When in its case the wing joint should always have the soft cloth wrapped around it to stop damage occurring to the long joint by the inevitable movement of these two joints against each other during transport.
Three or four times a year dust should be gently removed from under the key work using a small (approx.1cm wide) paint brush. To stop any moisture in the bottom of the instrument running back and ruining the lower boot joint pads, the bassoon should never be lowered beyond 45 degrees while playing or rested on a chair horizontally, until moisture has been tipped out of the small bore side of the boot joint.
A bassoon should never be laid on the floor or propped up on a chair with the boot on the floor, or stood up in the corner of a room with a wooden floor as inevitably an accident will occur, possibly causing serious damage.
A good way to get a new student bassoonist to appreciate the fact that different lip pressures should be applied to the reed from the lowest to the highest register on a bassoon, is to have them blow just on the reed producing the lowest note possible with loose lips then try to produce the next four higher notes of a major scale (up and down a few times) by progressively tightening the lips.
Right from the beginning the lungs should be filled with as much air as possible and air pressure maximised relative to lip pressure. In forming an embouchure the upper lip should be further forward on the reed than the lower lip in a natural overbite. To demonstrate a nice rounded embouchure, have the students pucker their lips very round and forward of the teeth, then place a finger in their mouth and squeeze the finger with the lips only while visualising the lips tightening around the finger like a drawstring bag.
While the lips are around the finger, push the lips gently backwards against the teeth so upper and lower lips comfortably cover the teeth. This is a good natural embouchure but it must be appreciated that almost everyone’s embouchure will look slightly different because of facial characteristics.
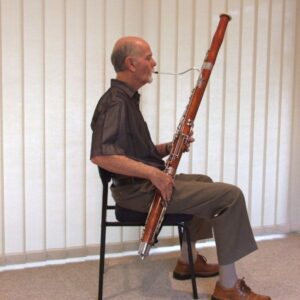
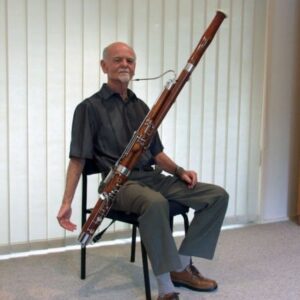
When playing, the student should sit with body straight and against the back of the chair so that the small of the back is supported. The whole body including torso, shoulders, neck and head should be nice and straight at all times.
To get maximum support from a seat strap, which is by far the best way for a student to support the instrument, the strap should be one-third from the front of the chair. Pressure should be applied sideways with the right leg thigh muscle against the instrument to the point where the bassoon is completely suspended and stationary without either hand on the instrument. This is essential to minimise or remove completely the weight of the bassoon on the left hand.
Very simple but affective reed adjustment can be carried out with just a pair of medium size long nose pliers. Adjustment must never be made when the reed is dry. If the reed tip is too open (more than 1mm in the centre) it may be too tiring on the embouchure, flat in the upper register and have an unfocussed sound. To correct, squeeze the first wire (the one nearest the lips) very gently from top and bottom to slightly close the tip.
If the tip is too close (less than 1mm in the centre) the sound may be too small and bright, the low register may be impossible to play loudly enough and the pitch may be too high. To correct, squeeze the first wire very gently from the sides to slightly open the tip. These simple corrections alone can have a surprisingly major effect and very often are all that is necessary to change an unplayable reed into a really good one